What if I told you there’s a way to schedule a popup in WordPress, Shopify, or your favorite ecommerce platform in literally minutes?
As you know, popups help you get new subscribers and customers looking for the best products and offers.
This is especially true during peak shopping times like the Black Friday/Cyber Monday weekend, when people are shopping around for the best deals and offers. They are more price-conscious and brands need attractive offers to win those customers.
However, peak shopping times also tend to be hectic, and ecommerce brands—especially small teams or solopreneurs—are juggling a lot.
The most successful ecommerce brands plan well in advance so that they can focus on other parts of their business during the peak shopping days.
That’s why we’re showing you how you can schedule a popup that will start and stop at the right time.
Why schedule a popup?
Popups help you get more subscribers and sales. After all, you can use popups not only for building your email or SMS list.
You can also use other types of popups — such as promotion forms or teasers — to promote new product launches, limited, time-sensitive offers and much more. These don’t collect subscribers, and can be aimed at current subscribers as well.
Scheduling your popup campaigns is therefore one of the easiest and most important ways to have a better chance of winning that sale or getting that subscriber. This is especially true for solopreneurs who have to manage everything on their own.
A main reason is that scheduled popups allow you to talk to that customer when they’re browsing your online store.
Imagine that you’re running a few campaigns across your website during a busy time like Black Friday. With everything else going on, you know you don’t have to worry about setting up your popup because you’ve already scheduled it weeks ago.
That means your popups will show at the right time, to the right people, and you won’t have to manually turn it on or off when the campaign’s over.
Just like with email & SMS automation, you’re able to reach the right customer at the perfect time.
I’ve got some good news for you: you can display targeted, time-specific deals and offers that convert better by scheduling your popups with Omnisend.
Omnisend can help you create beautiful, high-converting popup campaigns from start to finish in just a few minutes.
These popups are highly flexible too. You can:
- schedule the start and finish time, or have it always show
- target by audience behavior
- target by time on page
- target by UTM
- show on mobile, desktop, or both
- change the frequency
It’s flexible, but it’s not complicated.
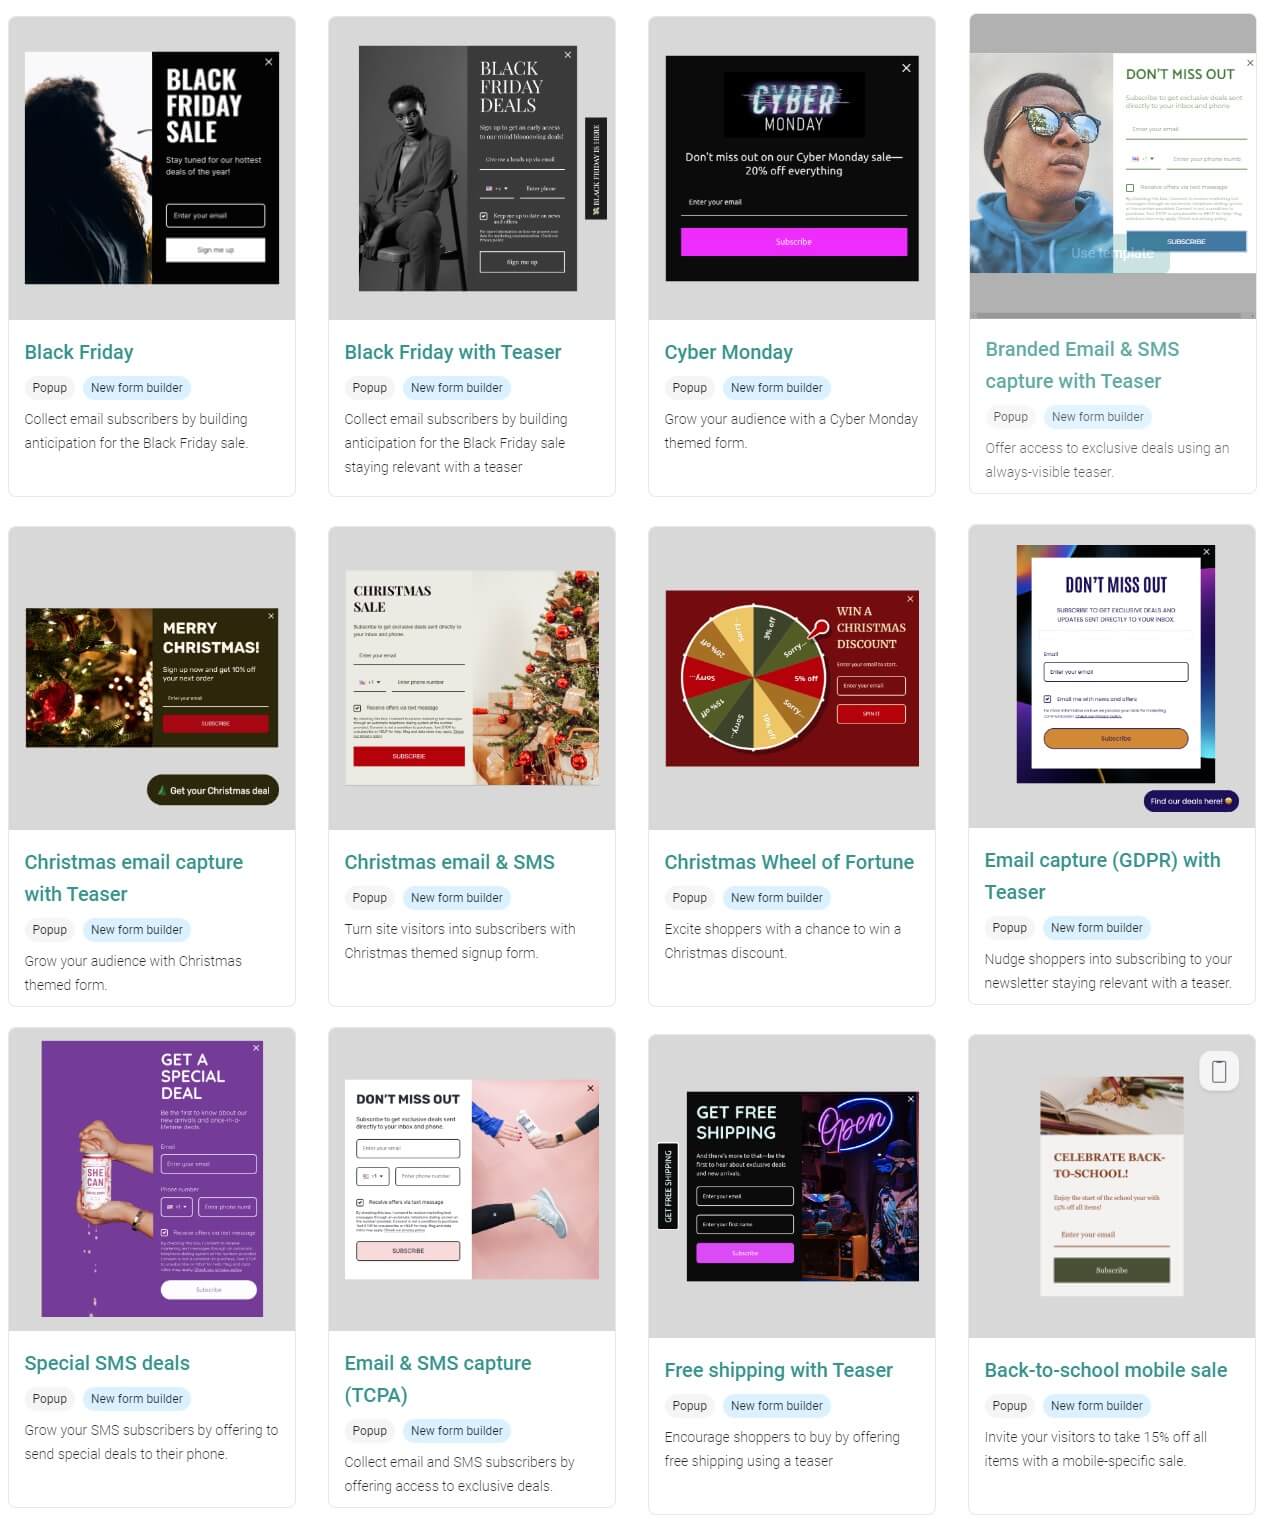
Omnisend has loads of beautiful, ready-made templates that help you to set up your popups in literally seconds (click on a template, click enable, and that’s it):
Schedule a popup in WordPress, Shopify, BigCommerce and more
If you didn’t know, Omnisend has a direct, one-click integration with WordPress (WooCommerce), Shopify, BigCommerce, and much more.
That means that you’ll be able to follow these steps on whatever platform you’re on.
Step 1: Install Omnisend
In order to use Omnisend, you need to have Omnisend installed. FYI: all plans come with all features, including our free plan.
Register for Omnisend here (it’s OK, we’ll wait).
Next, find Omnisend on WordPress, Shopify, BigCommerce, or your favorite platform. Don’t worry — no matter what platform you’re on, you’ll just have to click a button to get it on your store.
Once you’ve got it installed, let’s look at how easy it is to schedule your popups.
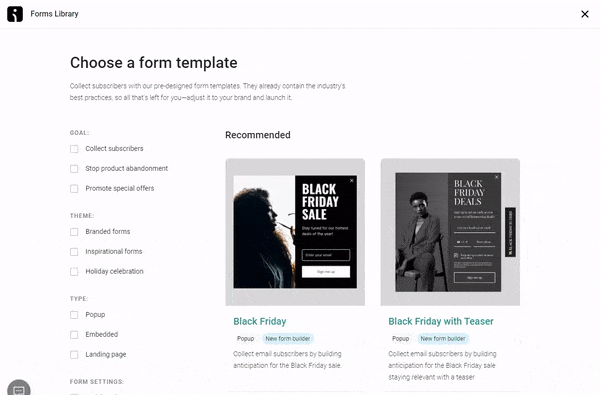
Step 2: Create your campaign
Omnisend has a wide variety of popups (or signup forms as we call them). This includes:
- popups
- landing pages
- Wheel of Fortune (a gamified popup)
- teaser
- embedded forms
- promotional forms
Today, we’re looking at how to schedule a popup.
Omnisend has a large library of popup templates.
You can choose a template not only by theme (like a holiday), but also by goal (like stopping abandonment or promoting an offer).
FYI: our Brand Assets feature automatically grabs your branding from your website. That means that your branding can automatically be imported in your popups.
When you’ve chosen your template, you can begin to customize your campaign with our drag-and-drop builder.
Step 3: Customize your popup
Inside the builder, you’ll see just how easy it is to customize it.
(Honestly though — these templates are pretty great by default, and some Omnisend clients simply enable them as is!)
You can easily change the title, description, or image. It’s also pretty easy to get more data from your customers, like their phone number, birthday, or even a custom field.
Here I’m adding a birthdate input into the popup:
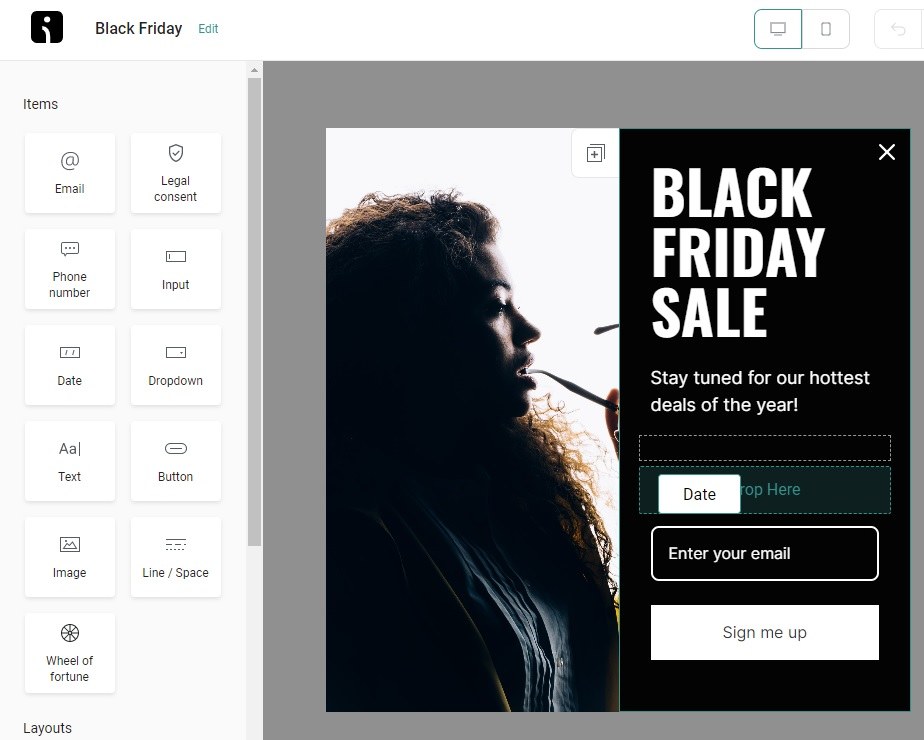
As you can see, there’s absolutely no coding skills required.
Once you’ve got your popups customized the way you want, let’s look at how to schedule your popup.
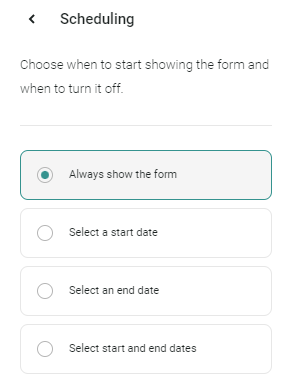
Step 4: Schedule your popup
This won’t be long — it’s pretty easy to schedule a popup with Omnisend.
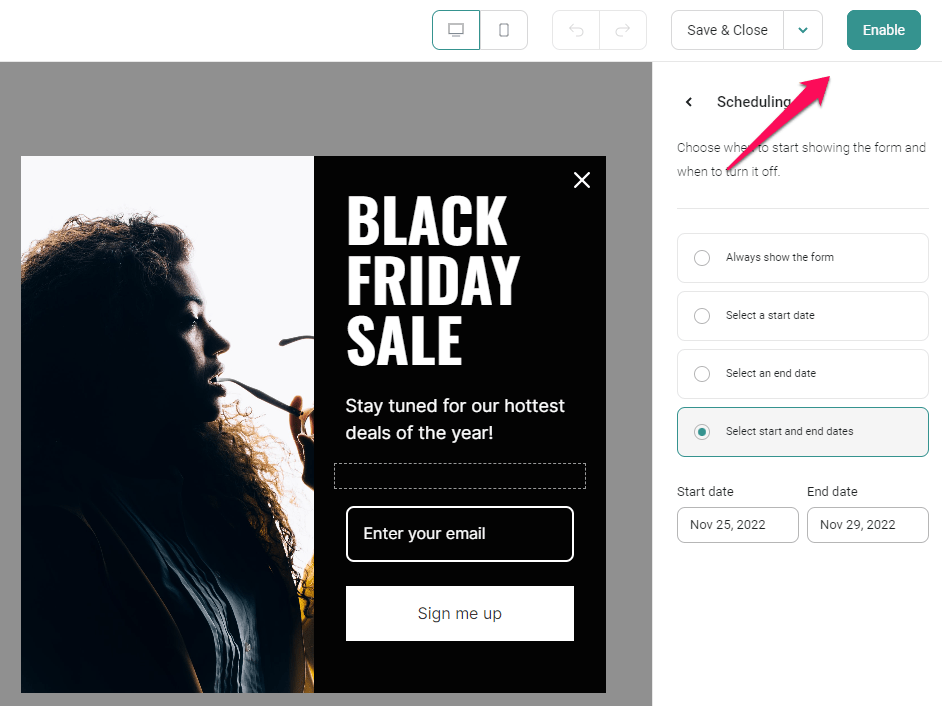
On the right-hand side, you’ll see the Scheduling setting.
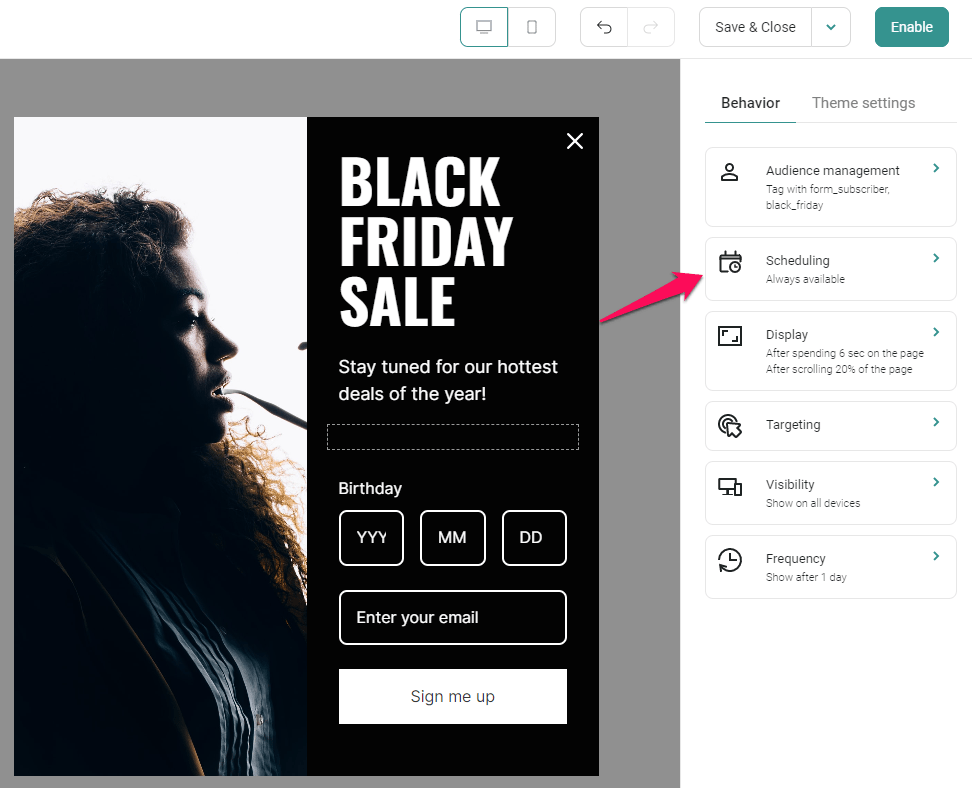
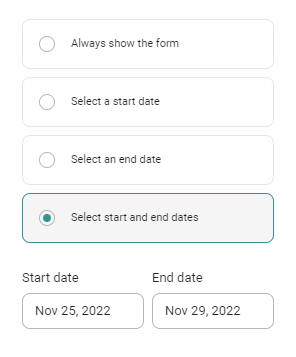
Click on that, and you’ll see four scheduling options:
- Always show the form (this is the default for all popup)
- Select a start date
- Select an end date
- Select start and end dates
Let’s say you have a Black Friday/Cyber Monday campaign that will give an amazing 50% off sitewide discount, but limited to the Friday through Monday period.
You can schedule your popup to launch immediately on that Friday and then automatically turn off on Giving Tuesday (the day after Cyber Monday).
That way, you don’t have to worry about forgetting to turn your campaigns on or off.
Important: in order to schedule the popup, you’ll have to enable it first (we show this in Step 6 below).
Step 5: Set up targeting, display and other options
There’s more you can do to give your popups a better chance at success.
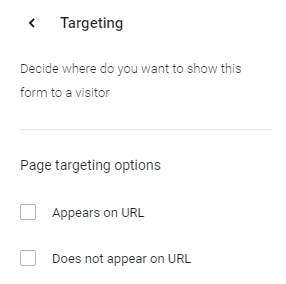
You can choose on what page, and for which visitors, to show the popup:
- You can show it on the whole website, or on a specific page, like a popular product
- If you used UTM links in your newsletter, you can show it to those people who clicked on a specific link
- You can hide the popup on specific pages or for specific UTMs
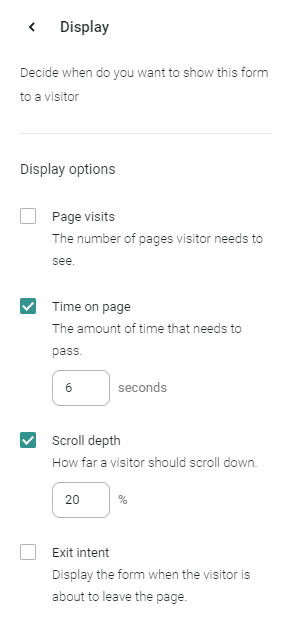
You can decide when to show your popup:
- After they’ve visited a number of pages
- After they spent a few seconds on the page
- After they’ve scrolled a certain depth
- When they’re about to leave to leave the page
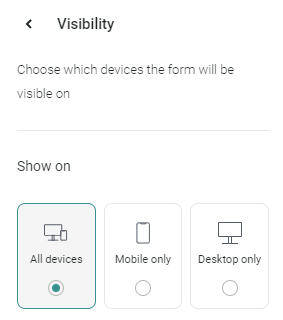
You can also make sure to show it only for desktop, mobile, or both:
Step 6: Enable your popup
This is the easiest step:
Once you’re happy with the entire setup, including the design and scheduling, targeting and display options, you just need to turn it on:
That’s literally it. You’ve just scheduled your popup with Omnisend!
In this example, my popup will begin to show on November 25 and turn off on November 29.
By the way, we do more than collecting subscribers or promoting offers. We also help you engage with your customers, so that you can build your brand loyalty and keep them around for longer.
Source from Omnisend
Disclaimer: The information set forth above is provided by Omnisend independently of Alibaba.com. Alibaba.com makes no representation and warranties as to the quality and reliability of the seller and products.